Wednesday, June 2, 2010

Sunkissed and Cookouts

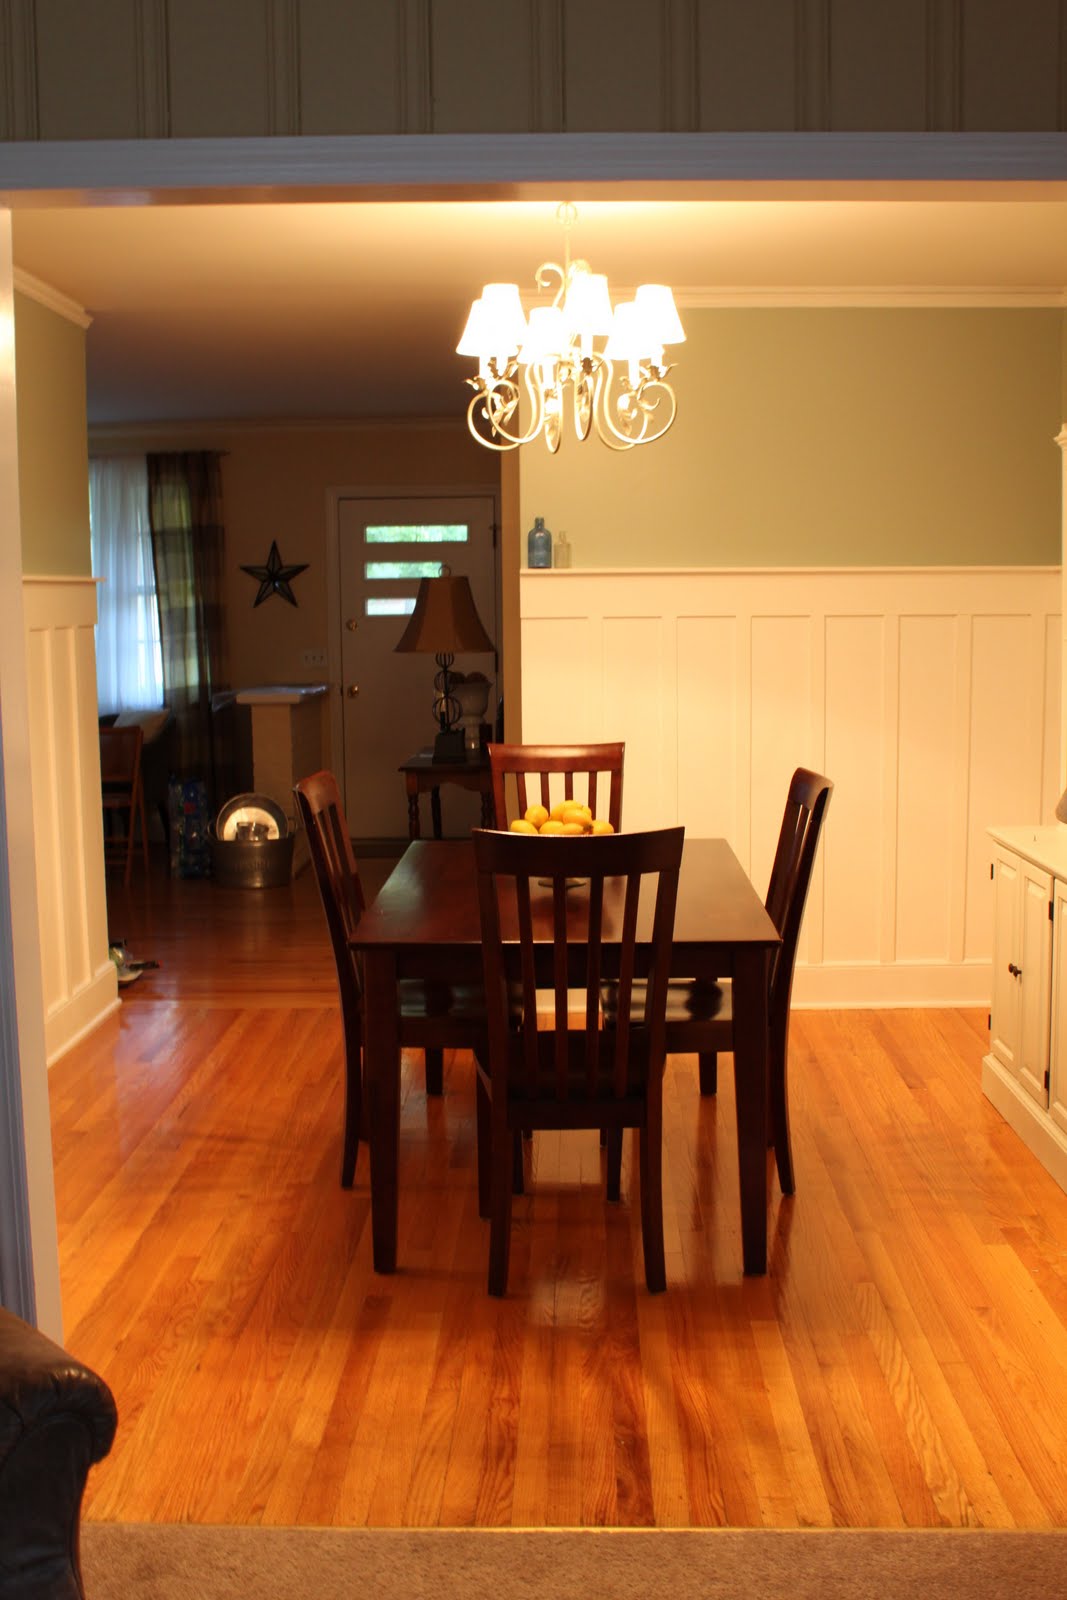
First and foremost I left out a few details in my previous post about our Board and Batten wall treatment. Just for knowledge, the bottom of the 6in horizontal strip is exactly 4ft from the top of the baseboard. The 2in perpendicular pieces are 10in apart. And finally, the green paint above the treatment is the same green that we used in the kitchen, Behr's Silver Sage.

I hope that clears that up. Now, to the new post...

Ok, if you haven't figured it out by now, Gregory the boys and I spent 3 fabulous days at the lake. The weather was wonderful and I needed some serious R&R. Because I wasn't able to post while I was there, there is now an overload of pictures to be blogged :). So enjoy!

This was my view for most of the time. I had a book (Return to Sullivans Island by Dorethea Benton Frank - Exhibit A) and a frozen margarita in my hands 99% of the time and boy, it was just what the doctor ordered.


Exhibit A-
Then of course all that rest and relaxation made me super sleepy so Exhibt B shows my "nap time" while enjoying the cool breeze and swaying hammock.

Later we found a GORGEOUS Hydrangea plant and I HAD to take some pictures of it. It was the most amazing color purple/blue I had ever seen.


Again, to remind you all where I spent most of the time, please see Exhibit C which shows me yet again, in the hammock. This is a great picture that depicts a day in the life of lake living. I can't believe Duke looked at the camera!


Like I said before, we had so many good pictures that there were just too many to post, so I had to make some collages. Duke is always my model and Rhett, well, he's usually on land somewhere taking a nap...


So, that's all I have so far. It was a fantastic time and we can't wait to go back. It's a great place to unwind and take a load off (and read a good book while cemented to a hammock :)).
Happy Tuesday everyone! Stay tuned for our next project...

Here Batten, Batten, Batten...

Well as many of you have read, we redid our dining room. I know, I know. When will we ever stop? To be honest, I think it's become an addiction. We just can't stay still! Hopefully one day we'll just look around and say "Ok, I think we're done." But it's not likely :).

So in our previous post, we mentioned that we were going to install a fun wall treatment to our dining room walls called, Board and Batten.

It was as super simple project (it took only a weekend to finish). However, I must warn you, if you don't like to paint this project IS NOT for you! It took 3 coats of paint and if you are a messy painter like me, you'll have just as many coats on your hands, legs, face, etc. :).

So without further ado, here are the befores...


And finally, the afters...


The rundown of the makeover is as follows:
1. Used MDF for the 6in board on top and the 2in boards that run perpendicular (the bottom molding was already there). Then we added a 2 in "shelf" on top out of the same MDF.
2. Painted with Behr's Ultra Pure White Primer and Paint. Again, even with the primer, you will need 3 coats. For some reason, white is much harder paint to cover other colors.
3. We replaced the chandelier with one I found a yard sale for $20 and added the shades that I found at Tuesday Morning for $4.00.
4. I painted the china cabinet the same color as our kitchen cabinets, Behr's Cotton Knit.
I think that's about it. I'm debating what to do with the dining table. Should I paint it? Just the chairs? Get upholstered chairs? Ahh, the decisions.
I hope you like our transformation. I think it turned out pretty good and adds a whole other dimension to our home.
Have a great Wednesdady everyone! I hope you enjoyed your day(s) off like we did :)!

Sunday, May 23, 2010

Let's Hear It For The Boy!

Yes, that's right...I made another song reference. I can't help it. What can I say? I'm a sucker for music (especially the 80's tunes)! Anywhoo, the reference is to Gregory's latest project. Normally, he is working on house projects, but since we are starting to catch up (and really all of our projects are just "wants" rather than "needs"), he decided to do a little side project on his own.

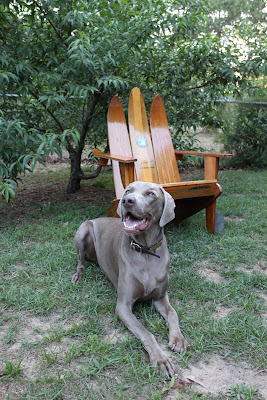
He had some old water skis that he acquired from his lake house and parents' house and has always wanted to build something with them. So, after finding some plans online, he set out to make an Adirondack chair! He did a fantastic job, and of course I had to share with everyone :). Below are the construction and final product pictures.
Mr. Safety didn't have his safety goggles, so I suppose the shades were the next best thing.

The dogs always "help" (hem - get in the way - hem) us with our projects...
Staining and polyurethaning.
Here you will find Gracin also "helping" Gregory with the staining of the boards.


And finally, the BEE-U-TI-FUL end result. I am super proud of him for making such an awesome chair!


The details...


And of course, being the (amateur) photographer that I'm trying to be, I decided to take this opportunity to make it look like a "catalogue" shoot :). It looks so much more appealing in front of our peach tree (too bad the peaches aren't ready to be picked) rather than on the porch with our dirty rug and nose printed, dirty glass door.


And of course no photoshoot is complete without pics of the pups :) and Duke was the perfect model! (Rhett didn't want to participate).

Sooo handsome :).

Well, that's all folks. It's time for me to head to bed! Come back this week because we've finished the dining room and I'll be posting pics soon! Night!

Tuesday, May 18, 2010

Board and Batten it up!

Good Morning Everyone! I wanted to post a little something about one of our current projects. I am IN LOVE with the "board and batten" look and we have decided that it would look fantastic in our dining room. For those of you who don't know what "board and batten" is, some of the pictures below will help.


Source

We've started painting and we decided to use the same colors as the kitchen (brown, green, white and cream.) I'll be sure to post the afters soon, but here are the befores:


So, the to-do list for the dining room is as follows:

1. Clear out room - done except for the large cabinet that will be painted my favorite white, Behr's Cotton Knit.
2. Paint top half of the walls - done, but still needs a second coat
3. Determine height of wall treatment and buy supplies
4. Borrow table saw and get to work :)
So, stay tuned...the afters should be up shortly!

Lazy Summer Days...will Be Spent On The Porch!

It's done! Well, almost. There are still some finishing touches to do, but for the most part it's complete.

We cannot wait to spend evenings and the weekends on this great outdoor space. It's definitely become an extension of our home and will be a great place to relax after a long day.

Here are pictures of what is looked like before...


It's a long rectangular area with brick stairs that run 99% of the length and it was pretty gross. To be honest, it was just being neglected.

Well now....it is bee-u-ti-ful! We love it and can't wait to start using it during the summer and fall! It's going to be our new hangout!

So here are the afters!


I found the patio furniture set and the pine table on craigslist and the green chairs are the ones I gave a facelift in this post. (And yes, that is Gracin in the picture)
The bench I bought at yard sale a while back for $20 bucks. I gave it a fresh coat of paint with my favorite Behr Color (Cotton Knit - Exterior Paint and Primer in one) and it looks great! The other white chair is an oldie from my apartment days and we are looking for another to match it.
Here are some of the details...again purchases from flea markets/yard sales.
And a night shot of the lone lamp (the other one isn't' plugged up) that Gregory's parents gave us...
So, there you go! Our new back porch! But I'm off to bed so tomorrow we can continue working on one of the other many projects we have going on (dining room makeover, occasional table redo, Gregory's adirondak chair, etc.)...goodnight!

Monday, May 17, 2010

It don't matter if you're black or white...

Ok, 100 points to those who notice the Michael Jackson reference in my title :).

Like I said in my previous post, we have lots of projects going on and one that I've been pretty excited about was hanging some pictures of the furbabies. With all the pictures and artwork in the house, we don't have any of the children.

So, I tried to find some good black frames with mattes and I couldn't find them anywhere without spending an arm or a leg! After going on one of my junkin' trips, I found 4 of these pictures:


Not a fan of the artwork, but they were exactly what I was looking for! They were only 5 bucks a piece and after a little sanding and spray painting and some new mattes..... (drumroll please)....

Tada:

They turned out really good and can always be changed out when a better picture comes a long :)!
Well that's all for now, but come on back...there more on the agenda :).

Sunday, May 16, 2010

The Color Wheel...

One thing I figured out while owning a red brick home, is that a red front door doesn't necessarily stand out...so back when we updated the mailbox (see post here), I decided to go ahead and paint the door the same tan color.

Here is what it looked like when we bought the place back in September:

And this is what it looked like after I painted it the tan color.
But after looking at the drab color for more than a week, I decided, NOPE, tan is also not a fancy color to use with a brick house. I did some research on front door colors and there was everything from fushion to turquoise, but I finally decided on yellow. Yes, yellow. I know it seems like a pretty intense color, but it looks really good with the brick (and I think it shows my creative side :)).


So, after 4 coats of yellow (because I painted it one yellow and it looked like a pollen ballon exploded on it) I decided on this mustard-y color. I think it turned out pretty good!

Doesn't it look much better than that crummy 'ole red door? Don't get my wrong. Red doors were all the rave at the old house when our house was painted brick, but not so much this time...

Well happy Sunday everyone. We have lots of projects in the mix right now so hopefully I'll be able to update le blog later in the week. Have a wonderful day!