Showing posts with label makeover. Show all posts

Saturday, September 11, 2010

Back to...Blogging!

Hi Everyone! I hope everyone had a fantastic summer and that it's coming to a nice close. It's been FOREVER since I've posted anything....and I'm so sorry! Our summer has been busy, but unfortunately not with home projects. I know we left you hanging on the guest bedroom re-do, so this post is going to be 100% devoted to that :).

Now, if you don't remember what this drab, not-fit-for-any-guest, guest room looked like before, let me remind you:


Pretty boring, huh? We agreed, and since my niece was coming to stay with us for a few days, what better time to give it a face lift?

Before I get to the grand finale, do you remember the sideboard that I found at a yard sale earlier in the summer for a whopping $10? I blogged about it in this post. Anywho, I thought it would look good in our extremely furniture-less formal living room, but turns out the guest bedroom had a perfect spot for it! As usually, I pulled out my trusty paint brush and my Behr paint and away I went transforming this little gem.

Here is what is looked like pre-makeover:


Gregory was my sander man and had to make a few minor repairs, but the good thing about painting furniture is that you don't have to worry about things being perfect! The paint fills in or covers all the imperfections and I think, gives it more character.
We gave it two coats of paint and wha-la! The finished product:

I think it turned out super, duper cute. I found some vintage knobs at a yard sale and some at Hobby Lobby (love their knob section) and together they completed the look!
Ok! Now to the room! Drum roll please..........brrrrrrrrrrrrrrrr..................
Remember the hints I gave in the guest room teaser post? Let me remind you :)...
Did you guess what that was? Well, if you guessed vintage earrings turned curtain hanger embellishments, then you're right! I didn't want the same old curtain rod and curtains and I figured that they wouldn't be opened and closed much, if at all, so I decided stationary curtains were the best. And that gave me some flexibility in how to hang 'em.
So, again I headed to Hobby Lobby to see what kind of hooks they had and dug around in my vintage "stuff" box and found 2 sets of vintage earrings that were dying to be re-purposed and poof! Instant curtain hangers! I simply attached the hooks on the wall, found some large headed nails and hot glued the earrings onto the nail (after hanging the curtains so I wouldn't pop them off). It looks adorable!
Here are some better views of the project...

Finally, the details.
We painted the walls a green sage color. I don't know the exact name because I found a huge 5 gallon bucket that had about 3 gallons in it at a yard sale for $2 bucks! Can you believe it? I couldn't either, but I jumped on it. I mean even if I only used a small portion, it was $2 bucks! You can't even find the mistinted paint for that price :). But I ended up using more than a "small portion" and it transformed this room into a tranquil retreat.

I accessorized it with some vintage and new items and tried to keep it simple (not only is this our guest room, but it doubles as my dressing room, so I can' t have all kinds of excess junk laying around :)).


I added a couple of Country Living (my favorite mag) issues and I completed a relaxing getaway!

I'm sure I'll continue to "tweak" it, but overall I'm pleased with the end result. Gotta love finishing a project!
I'm off for now my fellow bloggers, but stay tuned. I promise not to keep you waiting as long next time :). See ya!
P.S. Congrats to the Gamecocks on their win against 'dem Bulldogs :)! Go Cocks!

Monday, June 7, 2010

Rubba dub, dub!

Yes, you read right, the reference above has something to do with a bathroom renovation. Well, actually one renovation and one makeover. I know! We are officially insane, but I will preface this post with saying, our ideas or merely that. We have no immediate plans to start tearing down tile and ripping out our tub to find squirrel nests! (I don't think I posted that picture when we remodeled our old bathroom, so feast your eyes on our discovery...)


Yep, folks. That's exactly what you think it is...a squirrel tail and nest. Underneath our tub in our old house bathroom. I always heard Templeton (that's what I named him) under my bottom while taking a bath, but I never dreamed he was THAT close! It was an incredible nest! And certainly a scary find. It looked like the squirrel had eaten his own kind!

I know what y'all are saying..."They must be insane for thinking of another bath remodel." And to that I will answer, "yes." I will agree we have lost our minds, but I sure do love the thought of new, fresh bathroom!

So, to further confirm our insanity...let's talk bathrooms!

We have 2 1/2 baths in our house. Gregory uses the pepto pink bathroom in our master and I occupy the pea green guest bathroom in the hall. Both of which are far from being sexy but mine is in some serious need of a renovation.


I mean look at that floor! You could play checkers on it! Anyway, to continue our convo... The pea green, not so awesome bathroom has the following issues:
  • The obvious, pea green tile over 75% of the room (that was inaccurately matched by the previous owner, so the blue-green tiles that they bought do not at all match the pea-green tile that is currently there)

  • A peeling bathtub (that was reglazed by the previous homeowner to save money - not recommended)

  • Rusty old bath fixtures

  • An updated light fixture with some 1960's wallpaper stuck around it

  • And finally some kind of terrifying caulking, tub/tile separating thing going on...

These my friends are not the kinds of things you want when you are a bath connoisseur like me (well I'm not really a connoisseur, but I sure love my baths).

So, here is the idea for the not-so-soon reno.

  • A whirlpool tub (for soaking, drinking red wine and indulging in a good book.)

  • Subway tile tub surround

  • New flooring (I'd love Hardwood, but not sure I can convince the hubby of that.)

  • A old piece of furniture for the vanity

  • Some antique sconces to replace the solitary fixture over the mirror and possibly an antique chandelier

  • And last but not least (and certainly the icing on the cake) a small flat panel TV for me to catch up on my latest episodes of Grey's Anatomy (or Private Practice or Mercy or Castle or, well you get the point. I watch A LOT of shows).

But, like I said before, this is a "back burner project." We have decided that we can't do the "hey honey, what have you been doing while I was out shopping?" "Oh, just ripped out the ______." conversations anymore. We need to have a serious plan. And the bathroom plan is going to begin with the old piece of furniture we find to use as a vanity and a good deal on a whirpool tub. Once those bad boys are purchased, it's game on.

So, be on the lookout for a great deal on a vanity/dresser. I know I'll be on the hunt :).

I will say I LOVE this bathroom that Sarah Richardson re-did in her country cottage...

In other news. Since you all know we can't keep our little bums still and we have the bathroom redo itch, our next plan of attack on the house is going to be in the 1/2 bath. This little jewel is the perfect size for a weekend warrior project and we plan to do just that in the next few months. Our inspiration photo comes from County Living and I knew as soon as I saw it, that was exactly what I wanted to do in our bath.

{ Source}

Our powder room (as they are usually called) is set up the EXACT same way and I can't wait to get to work.

Well, that's all for now. I hope I've inspired you to start a new project. I'd love to see pictures if you have 'em! Good night everyone and I'll post again soon!

Sunday, June 6, 2010

Smorgasbord - Part Dos

Happy Sunday everyone! Well again, we don't have any major project posts, so I decided to do another post of randomness...

First, we'll start with another frame/picture makeover. I found these frames (we got 2 of them) when I went with my mom to the mountains a few weeks back. I loved the print, but the burgundy frame was not at all in my color scheme. So I brought them home, did a little sanding and priming, then spray painted them black. They turned out super cute. Here is the before pic:

And here is what they look like after. Love 'em!


Ok, remember the little table I made over in my previous post. Well I did another switch-a-roo after I came back with a super cute lamp and some vintage cameras from my yardsaling yesterday. It was out with the black lamp and apples (I move them to the corner of the bar) and in with the new lamp, cameras, a chair I had in another corner and some plates I had laying around. I think it looks much better than the lonely nook before.

Next on the smorgasbord we have our very unused formal living room. For those of you who don't know, we have a den, a rec room and formal living room (way too many seating rooms for me, but I suppose it will be good one day...). So the only things we have in that room are this little seating area, the pictures from the beginning of this post and the table ensemble shown below.

Most of the items in this picture are from a yard sale. What can I say? I'm a sucker for a deal. But note to self, I do have to have those chairs recovered one day...


Next, I'm back to the dining room. I got some good input from a friend about moving my chairs to either side of the hutch, so I did and it looks great! She also suggested I get some upholstered chairs for the ends, so I'm on a mission to find those...I sure wish I knew how to cover furniture it would make my life so much easier, not to mention cheaper!

Anyway, other than the musical chairs, I did some switching around inside the hutch, added some things up top and did a little centerpiece. I still need to get some things on the wall, so I'll be keeping my eyes peeled at the markets and sales. (I do have some white plates that will be making their way in there soon...)


Finally! (And I'll stop with all the randomness...) I am revisiting the front door. We had some blank space on the left side of the door and it was driving me crazy! I couldn't think what to put there. So eventually my brain woke up and I realized I had these really strange, metal thingys that I bought from Hobby Lobby a while back that I had no use for. I decided they would look great against the brick, so I put one on the front porch and painted one for the back.

For the front, we paired the metal thingy with a planter basket that I found at my trusty Tuesday Morning, added some cute plants and wa-la! Instant floral decor. It turned out great!

For those who don't remember the before, view this post...

And here are the afters. Oh and btw, I found a new light fixture at a yard sale for a buck! I gave it quick coat of black and it was the perfect fix to our old broken one.

Ok, enough with the rambling. It's time to go take it easy for a while, something we don't do very often. I will say this though, we are getting bathroom redo fever....

Wednesday, June 2, 2010

Here Batten, Batten, Batten...

Well as many of you have read, we redid our dining room. I know, I know. When will we ever stop? To be honest, I think it's become an addiction. We just can't stay still! Hopefully one day we'll just look around and say "Ok, I think we're done." But it's not likely :).

So in our previous post, we mentioned that we were going to install a fun wall treatment to our dining room walls called, Board and Batten.

It was as super simple project (it took only a weekend to finish). However, I must warn you, if you don't like to paint this project IS NOT for you! It took 3 coats of paint and if you are a messy painter like me, you'll have just as many coats on your hands, legs, face, etc. :).

So without further ado, here are the befores...


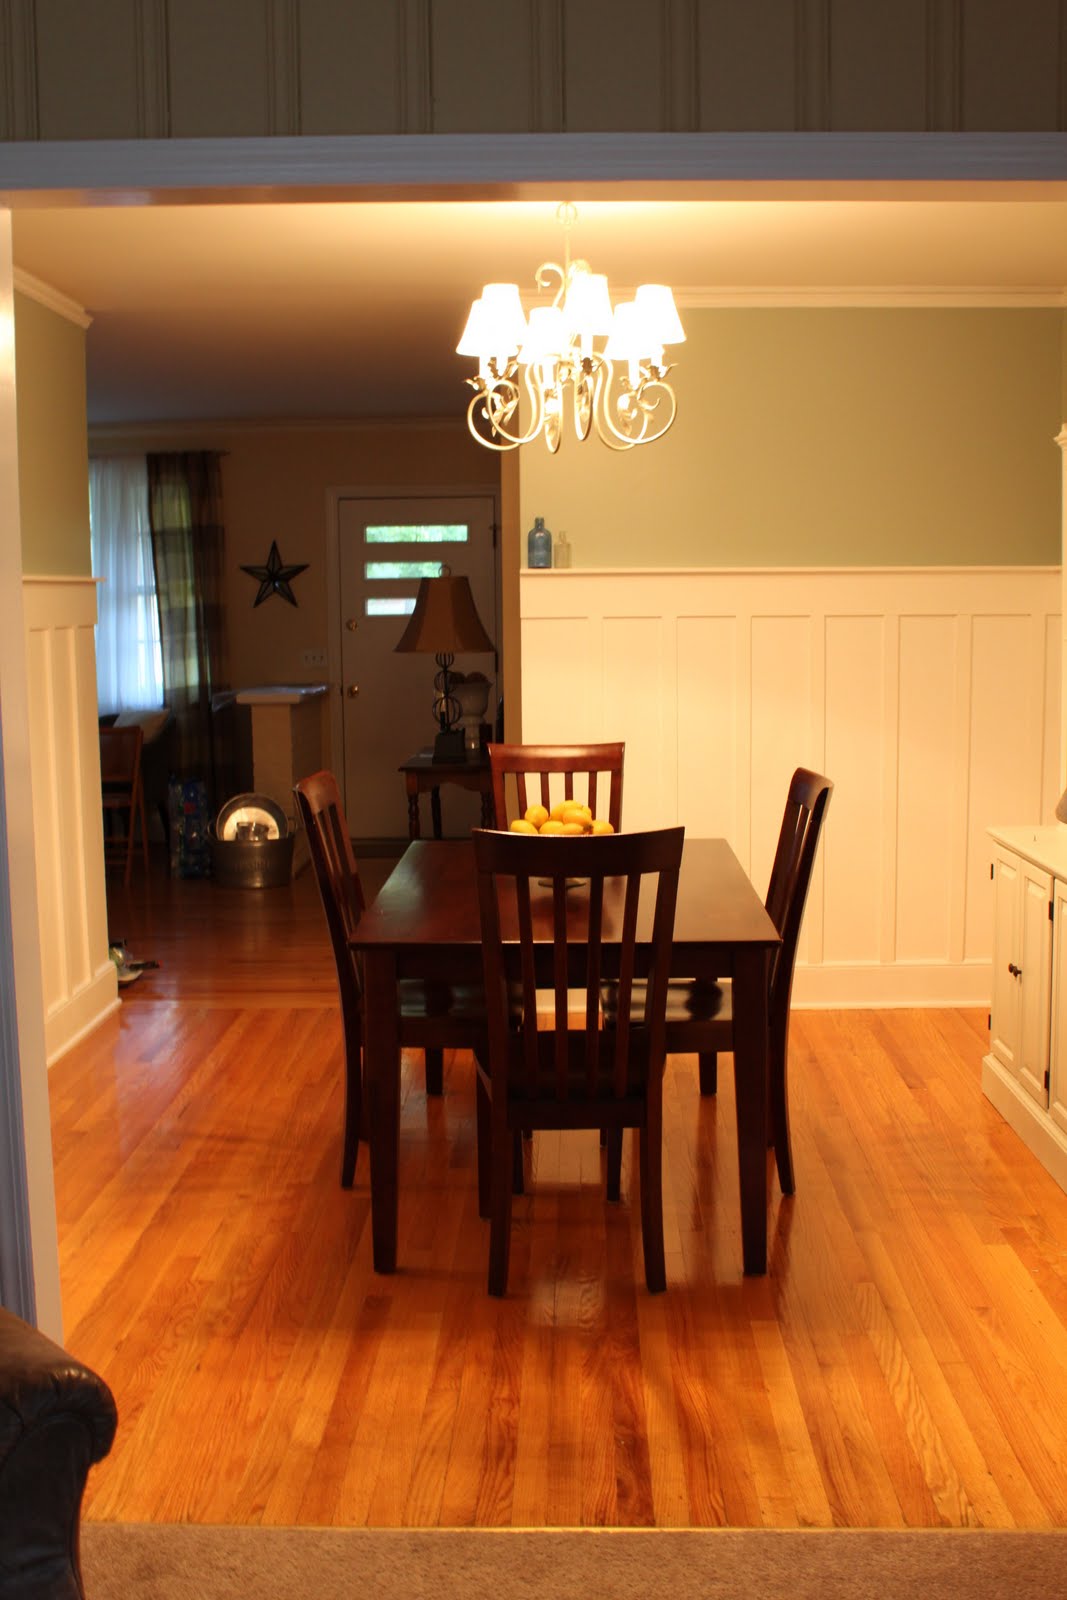
And finally, the afters...


The rundown of the makeover is as follows:
1. Used MDF for the 6in board on top and the 2in boards that run perpendicular (the bottom molding was already there). Then we added a 2 in "shelf" on top out of the same MDF.
2. Painted with Behr's Ultra Pure White Primer and Paint. Again, even with the primer, you will need 3 coats. For some reason, white is much harder paint to cover other colors.
3. We replaced the chandelier with one I found a yard sale for $20 and added the shades that I found at Tuesday Morning for $4.00.
4. I painted the china cabinet the same color as our kitchen cabinets, Behr's Cotton Knit.
I think that's about it. I'm debating what to do with the dining table. Should I paint it? Just the chairs? Get upholstered chairs? Ahh, the decisions.
I hope you like our transformation. I think it turned out pretty good and adds a whole other dimension to our home.
Have a great Wednesdady everyone! I hope you enjoyed your day(s) off like we did :)!

Tuesday, May 18, 2010

Board and Batten it up!

Good Morning Everyone! I wanted to post a little something about one of our current projects. I am IN LOVE with the "board and batten" look and we have decided that it would look fantastic in our dining room. For those of you who don't know what "board and batten" is, some of the pictures below will help.


Source

We've started painting and we decided to use the same colors as the kitchen (brown, green, white and cream.) I'll be sure to post the afters soon, but here are the befores:


So, the to-do list for the dining room is as follows:

1. Clear out room - done except for the large cabinet that will be painted my favorite white, Behr's Cotton Knit.
2. Paint top half of the walls - done, but still needs a second coat
3. Determine height of wall treatment and buy supplies
4. Borrow table saw and get to work :)
So, stay tuned...the afters should be up shortly!

Lazy Summer Days...will Be Spent On The Porch!

It's done! Well, almost. There are still some finishing touches to do, but for the most part it's complete.

We cannot wait to spend evenings and the weekends on this great outdoor space. It's definitely become an extension of our home and will be a great place to relax after a long day.

Here are pictures of what is looked like before...


It's a long rectangular area with brick stairs that run 99% of the length and it was pretty gross. To be honest, it was just being neglected.

Well now....it is bee-u-ti-ful! We love it and can't wait to start using it during the summer and fall! It's going to be our new hangout!

So here are the afters!


I found the patio furniture set and the pine table on craigslist and the green chairs are the ones I gave a facelift in this post. (And yes, that is Gracin in the picture)
The bench I bought at yard sale a while back for $20 bucks. I gave it a fresh coat of paint with my favorite Behr Color (Cotton Knit - Exterior Paint and Primer in one) and it looks great! The other white chair is an oldie from my apartment days and we are looking for another to match it.
Here are some of the details...again purchases from flea markets/yard sales.
And a night shot of the lone lamp (the other one isn't' plugged up) that Gregory's parents gave us...
So, there you go! Our new back porch! But I'm off to bed so tomorrow we can continue working on one of the other many projects we have going on (dining room makeover, occasional table redo, Gregory's adirondak chair, etc.)...goodnight!

Monday, May 17, 2010

It don't matter if you're black or white...

Ok, 100 points to those who notice the Michael Jackson reference in my title :).

Like I said in my previous post, we have lots of projects going on and one that I've been pretty excited about was hanging some pictures of the furbabies. With all the pictures and artwork in the house, we don't have any of the children.

So, I tried to find some good black frames with mattes and I couldn't find them anywhere without spending an arm or a leg! After going on one of my junkin' trips, I found 4 of these pictures:


Not a fan of the artwork, but they were exactly what I was looking for! They were only 5 bucks a piece and after a little sanding and spray painting and some new mattes..... (drumroll please)....

Tada:

They turned out really good and can always be changed out when a better picture comes a long :)!
Well that's all for now, but come on back...there more on the agenda :).